Northwestern IT maintains a Splunk instance for capturing, indexing, searching, and aggregating event data. Splunk natively supports ingesting logs and event data from various sources in Amazon Web Services, including CloudTrail, S3 and CloudFront access logs, AWS Config Rules, even generic log files stored in S3.
For more information about Splunk, refer to these resources:
- Northwestern Splunk Community of Practice (Teams)
- Splunk Documentation
- Splunk Add-On For AWS Documentation
The process of sending logs from AWS to Splunk consists of these steps:
- Create an IAM Role with an attached IAM Access Policy that allows it to read your event sources in AWS
- Send the role and event source details to the Northwestern Splunk support team
- Log in to Splunk and confirm the events are indexed properly
1. Create an IAM Role for Splunk Access
Log in to your AWS account with a role that allows you to create and modify IAM roles and policies.
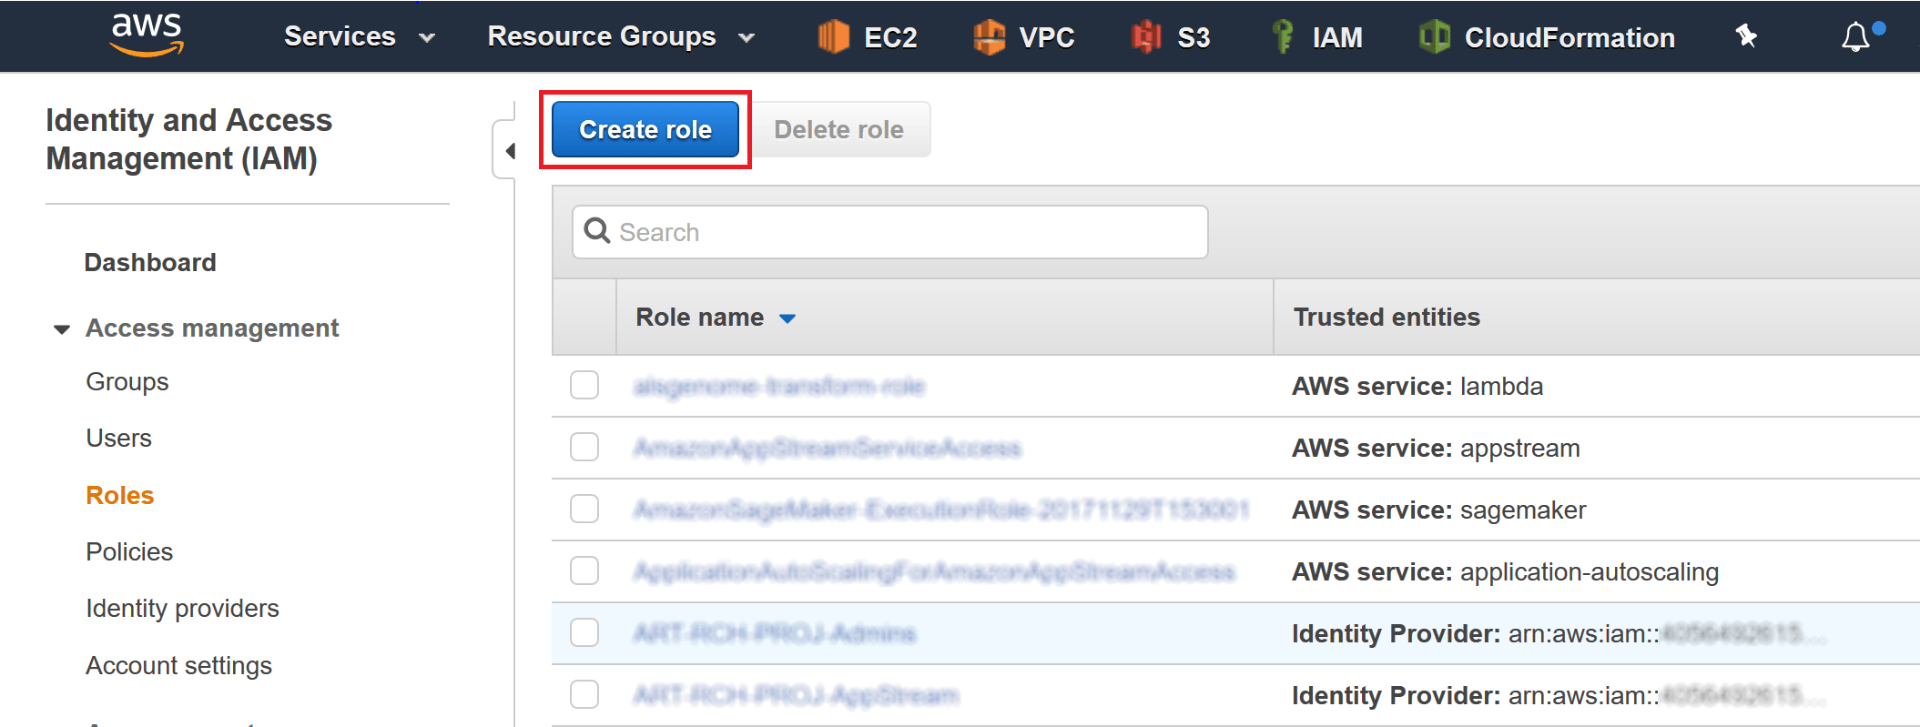
Go to the IAM console and click Roles in the left navigation, then click the “Create Role” button:

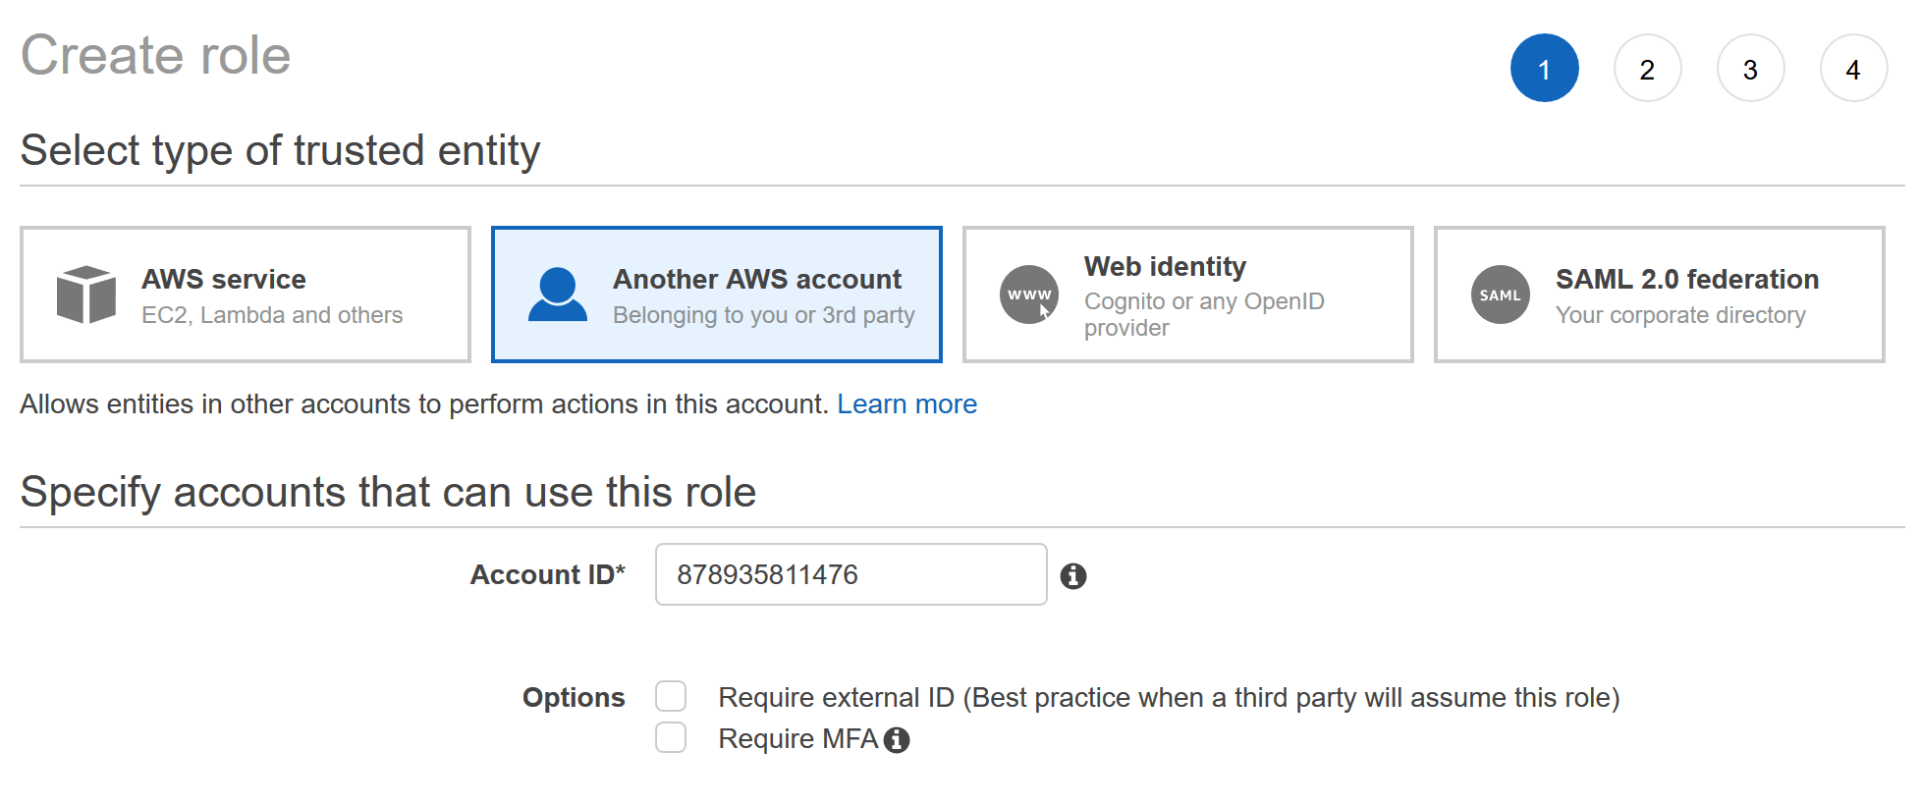
On the next screen, choose “Another AWS account” and enter “878935811476” as the Account ID (this is the Account ID of the AWS account used by Northwestern IT for Splunk access):

Then click the “Next: Permissions” button.
If you do not already have an IAM Policy created for this Splunk access role, click the “Create policy” button, which will open a new browser tab. In this new tab, click the “JSON” tab and paste in the following JSON policy document:
{
  "Version": "2012-10-17",
  "Statement": [
    {
      "Effect": "Allow",
      "Action": [
        "sqs:GetQueueAttributes",
        "sqs:ListQueues",
        "sqs:ReceiveMessage",
        "sqs:GetQueueUrl",
        "sqs:SendMessage",
        "sqs:DeleteMessage",
        "s3:ListBucket",
        "s3:GetObject",
        "s3:GetBucketLocation",
        "s3:ListAllMyBuckets",
        "s3:GetBucketTagging",
        "s3:GetAccelerateConfiguration",
        "s3:GetBucketLogging",
        "s3:GetLifecycleConfiguration",
        "s3:GetBucketCORS",
        "config:DeliverConfigSnapshot",
        "config:DescribeConfigRules",
        "config:DescribeConfigRuleEvaluationStatus",
        "config:GetComplianceDetailsByConfigRule",
        "config:GetComplianceSummaryByConfigRule",
        "iam:GetUser",
        "iam:ListUsers",
        "iam:GetAccountPasswordPolicy",
        "iam:ListAccessKeys",
        "iam:GetAccessKeyLastUsed",
        "autoscaling:Describe*",
        "cloudwatch:Describe*",
        "cloudwatch:Get*",
        "cloudwatch:List*",
        "sns:Get*",
        "sns:List*",
        "sns:Publish",
        "logs:DescribeLogGroups",
        "logs:DescribeLogStreams",
        "logs:GetLogEvents",
        "ec2:DescribeInstances",
        "ec2:DescribeReservedInstances",
        "ec2:DescribeSnapshots",
        "ec2:DescribeRegions",
        "ec2:DescribeKeyPairs",
        "ec2:DescribeNetworkAcls",
        "ec2:DescribeSecurityGroups",
        "ec2:DescribeSubnets",
        "ec2:DescribeVolumes",
        "ec2:DescribeVpcs",
        "ec2:DescribeImages",
        "ec2:DescribeAddresses",
        "lambda:ListFunctions",
        "rds:DescribeDBInstances",
        "cloudfront:ListDistributions",
        "elasticloadbalancing:DescribeLoadBalancers",
        "elasticloadbalancing:DescribeInstanceHealth",
        "elasticloadbalancing:DescribeTags",
        "elasticloadbalancing:DescribeTargetGroups",
        "elasticloadbalancing:DescribeTargetHealth",
        "elasticloadbalancing:DescribeListeners",
        "inspector:Describe*",
        "inspector:List*",
        "kinesis:Get*",
        "kinesis:DescribeStream",
        "kinesis:ListStreams",
        "kms:Decrypt",
        "sts:AssumeRole"
      ],
      "Resource": [
        "*"
      ]
    }
  ]
}
This policy will grant Splunk read-only access to all services in AWS it is able to index. To grant access to only specific services or resources, refer to https://docs.splunk.com/Documentation/AddOns/released/AWS/ConfigureAWSpermissions for examples.
Click the “Review Policy” button. Give the policy a name such as “SplunkReadOnly” and click the “Create Policy” button. When you see the confirmation message that the policy has been created, you can close the tab.
On the previous tab, where you had clicked the “Create Policy” button, click the “refresh” button on the top right:

Search for your new policy by name in the “Filter Policies” box, then click the checkbox for your policy and click the “Next: Tags” button:

Give your new role any tags you wish (for example: Application = Splunk) then click “Next: Review”.
Give the role a name (example: “SplunkAccessRole”) and then click the “Create Role” button.
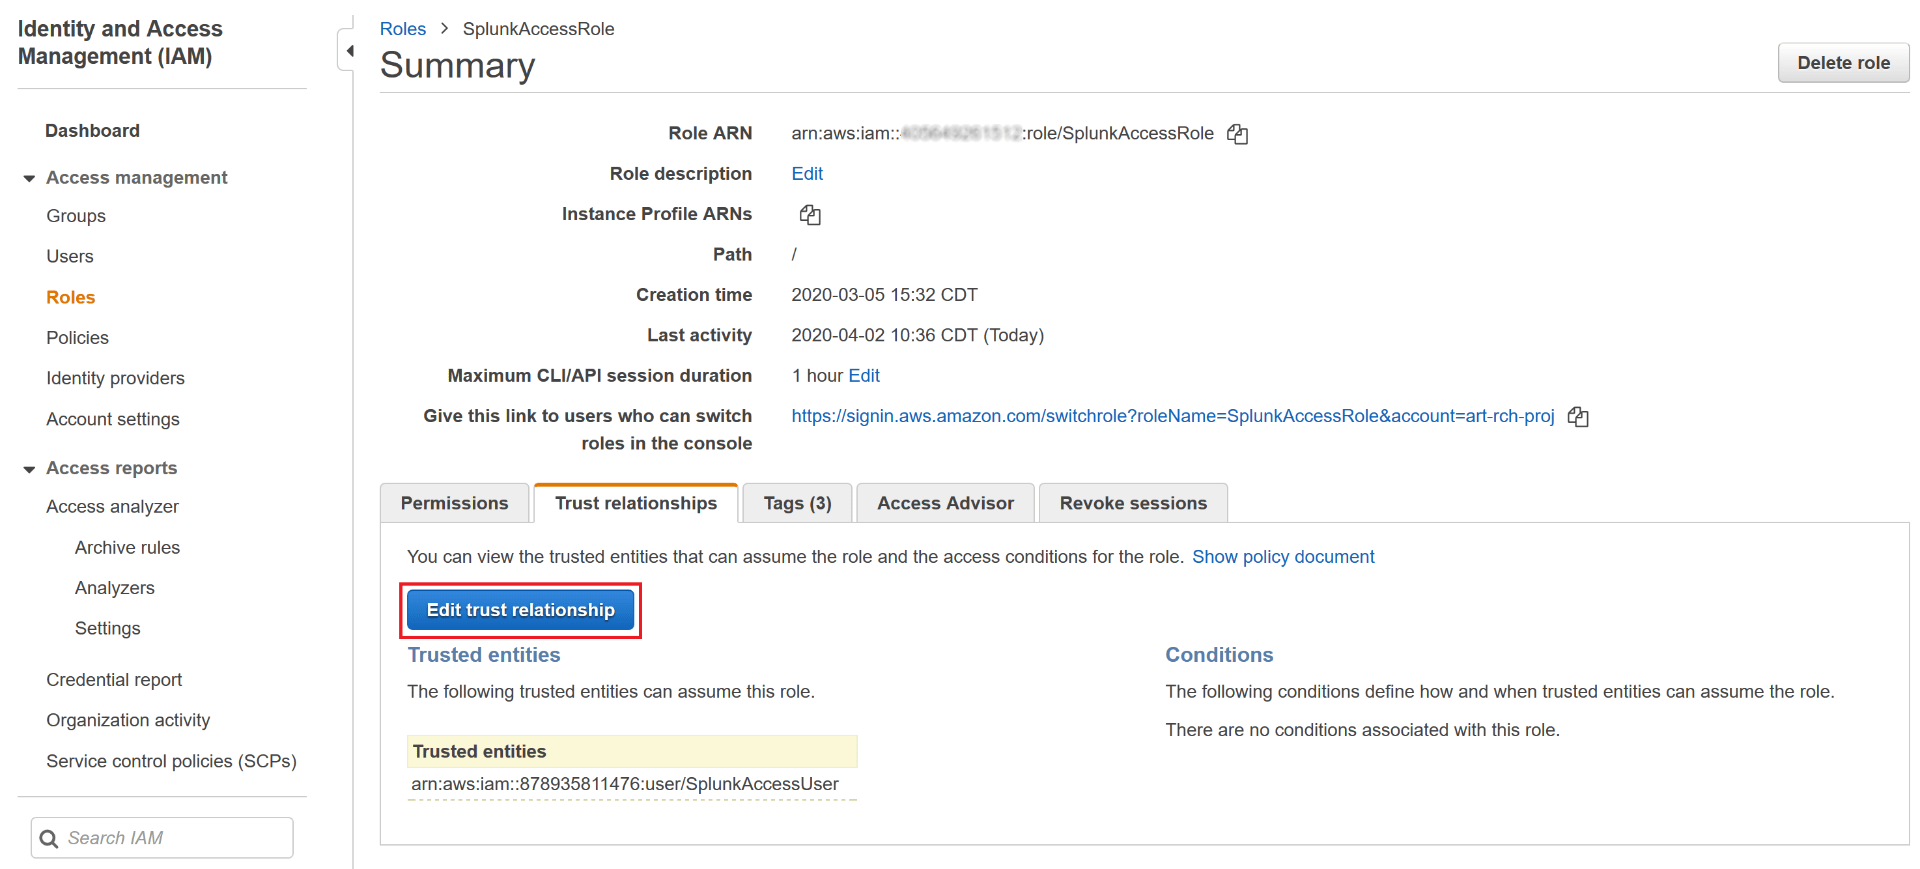
On the IAM role screen, search for your newly created role by name, then click on it. Click the “Trust Relationship” tab, then click the “Edit trust relationship” button:

Paste in the following JSON document (this step further limits access to your role to only the IAM user used by Splunk):
{
  "Version": "2012-10-17",
  "Statement": [
    {
      "Effect": "Allow",
      "Principal": {
        "AWS": "arn:aws:iam::878935811476:user/SplunkAccessUser"
      },
      "Action": "sts:AssumeRole",
      "Condition": {}
    }
  ]
}
Then click “Update Trust Policy”.
2. Send IAM Role ARN and Event Source Details to the Splunk team
On the Summary page for your role in the AWS IAM console, copy the Role ARN.
Create a ticket in Footprints, either manually or via email to consultant@northwestern.edu, and include the following information:
- A statement that you are requesting new events to be indexed in Splunk (so the ticket is assigned to the correct team)
- The Role ARN you copied from the AWS IAM console
- Details of the events/logs you want indexed in Splunk. Depending on the event source type, you will need to include certain extra information (for example for S3 access logs, include the S3 bucket name). Documentation for the available Splunk AWS source types is available here: https://docs.splunk.com/Documentation/AddOns/released/AWS/DataTypes
3. Confirm Events are Being Indexed Properly
Once the Footprints ticket is completed, you can log into Splunk at https://splunk.northwestern.edu/ and search for events. Refer to https://docs.splunk.com/Documentation/AddOns/released/AWS/DataTypes for the sourcetype value to use in Splunk to search for each data source.
